Dynamically scale a Nomad cluster with the Nomad Autoscaler
Batch jobs are commonly used to execute specific computation and often require special hardware configuration, such as large amounts of CPU and memory, or highly-specialized devices, like GPUs.
Unlike service jobs, batch workloads are only active for certain periods of time, so the custom infrastructure required to run them is left unused when there are no jobs to run.
With the Nomad Autoscaler, it's possible to automatically provision clients only when a batch job is enqueued, and decommission them once the work is complete, saving time and money, since there's no need for manual intervention and the resources are only active for just as long as there are jobs to run.
This tutorial provides a basic demo for provisioning clients on demand, as new requests for running a batch job are enqueued. During this tutorial you will:
Deploy sample infrastructure running a demonstration environment.
Review autoscaling policies and see how they can be used for cluster scaling.
While monitoring the included dashboard:
Dispatch batch jobs and observe the cluster scaling out.
Observe the cluster scaling in once the batch jobs complete.
Note
The infrastructure built as part of the demo has billable costs and is not suitable for production use. Please consult the reference architecture for production configuration.
Requirements
In order to execute the demo, you need the following applications with the listed version or greater installed locally.
If you are running this demo in a Windows environment it is recommended to use the Windows Subsystem for Linux.
Fetch the Nomad Autoscaler demos
Download the latest code for the Autoscaler demos from the
GitHub repository. You
can use git to clone the repository or download the ZIP archive.
Clone the hashicorp/nomad-autoscaler-demos repository.
$ git clone https://github.com/hashicorp/nomad-autoscaler-demos$ cd nomad-autoscaler-demos/cloud/demos/on-demand-batchCheck out the learn tag. Using this tag ensures that the instructions in
this guide match your local copy of the code.
$ git checkout learnChange into the cloud specific demonstration directory
The AWS-specific demonstration code is located in the aws directory. Change
there now.
$ cd awsCreate the demo infrastructure
There are specific steps to build the infrastructure depending on which provider you wish to use. Please navigate to the appropriate section below.
Configure AWS credentials
Configure AWS credentials for your environment so that Terraform can authenticate with AWS and create resources.
To do this with IAM user authentication, set your AWS access key ID as an environment variable.
$ export AWS_ACCESS_KEY_ID="<YOUR_AWS_ACCESS_KEY_ID>"Now set your secret key.
$ export AWS_SECRET_ACCESS_KEY="<YOUR_AWS_SECRET_ACCESS_KEY>"Tip
If you don't have access to IAM user credentials, use another authentication method described in the AWS provider documentation.
Build Terraform variables file
In order for Terraform to run correctly you will need to provide the appropriate
variables within a file named terraform.tfvars. Create your own variables file
by copying the provided terraform.tfvars.sample file.
$ cp terraform.tfvars.sample terraform.tfvarsUpdate the variables for your environment
region- The region to deploy your infrastructure.key_name- The name of the AWS EC2 Key Pair that you want to associate to the instances.owner_name- Added to the created infrastructure as a tag.owner_email- Added to the created infrastructure as a tag.
For example, to deploy your cluster in the us-east-1 region with the AWS EC2
Key Pair named user-us-east-1, your variables file would look similar to the
following:
region = "us-east-1"key_name = "user-us-east-1"owner_name = "alovelace"owner_email = "alovelace@example.com"Run Terraform
Provision your demo infrastructure by using the Terraform "init, plan, apply" cycle:
$ terraform init$ terraform plan$ terraform apply --auto-approveOnce the terraform apply finishes, a number of useful pieces of information
should be output to your console.
...Outputs:detail = <<EOTServer IPs: * instance settling-halibut-server-1 - Public: 100.24.124.185, Private: 172.31.11.46The Nomad UI can be accessed at http://settling-halibut-servers-1191809273.us-east-1.elb.amazonaws.com:4646/uiThe Consul UI can be accessed at http://settling-halibut-servers-1191809273.us-east-1.elb.amazonaws.com:8500/uiGrafana dashboard can be accessed at http://settling-halibut-platform-628706379.us-east-1.elb.amazonaws.com:3000/d/CJlc3r_Mk/on-demand-batch-job-demo?orgId=1&refresh=5sTraefik can be accessed at http://settling-halibut-platform-628706379.us-east-1.elb.amazonaws.com:8081Prometheus can be accessed at http://settling-halibut-platform-628706379.us-east-1.elb.amazonaws.com:9090CLI environment variables:export NOMAD_ADDR=http://settling-halibut-servers-1191809273.us-east-1.elb.amazonaws.com:4646EOTCopy the export commands underneath the CLI environment variables heading and run these in the shell session you will run the rest of the demo from.
Explore the demo environment
This demo creates two sets of clients, identified by their datacenter. The first set runs service and system type jobs: a Traefik job for traffic ingress, Prometheus for scraping and storing metrics, Grafana for dashboards, and the Nomad Autoscaler. The Terraform output shows URLs that can be used to access and explore them.
It may take a few minutes for all the applications to start. If any of the URLs doesn't load the first time, or you see any error messages, wait a little and retry it.
The second set of clients runs instances of a dispatch batch job. The number of clients in this set will depend on how many batch jobs are in progress. Since initially there are no batch jobs running or enqueued, there are zero clients in this datacenter.
You can see the list of jobs registered in the cluster using the nomad job status command.
$ nomad job statusID Type Priority Status Submit Dateautoscaler service 50 running 2021-04-12T23:53:09Zbatch batch/parameterized 50 running 2021-04-12T23:53:09Zgrafana service 50 running 2021-04-12T23:53:09Zprometheus service 50 running 2021-04-12T23:53:09Ztraefik system 50 running 2021-04-12T23:53:09ZYou can also use the nomad node status command
to see that there is only one client running, and that it is part of the
platform datacenter. Notice that there are no clients for the batch_workers
datacenter yet.
$ nomad node statusID DC Name Class Drain Eligibility Status95bee7a7 platform ip-172-31-5-98 hashistack false eligible readyExploring the Nomad Autoscaler and batch job
The job file for the batch job can be found one directory up, in a Terraform
module that is shared across cloud providers.
../shared/terraform/modules/nomad-jobs/jobs/batch.nomadThe interesting parts of this job is that it is a parameterized batch job, so we
can dispatch it multiple times. It is also restricted to only run in clients
that are placed in the batch_workers datacenter.
job "batch" { datacenters = ["batch_workers"] type = "batch" parameterized { meta_optional = ["sleep", "splay"] } meta { sleep = "180" splay = "60" } # ...}It also requires a large amount of memory, so each instance of this job requires a full client to run.
job "batch" { # ... group "batch" { task "sleep" { # ... resources { cpu = 100 memory = 1500 } } }}The Nomad Autoscaler job contains the cluster scaling policy used to scale the
number of clients in the batch_workers datacenter based on the number of
batch jobs that are in progress (either running or queued).
The job file for the Autoscaler can be found inside the jobs folder.
./jobs/autoscaler.nomad.tplThe scaling policy is described in a template block that is rendered inside
the autoscaler task.
job "autoscaler" { # ... group "autoscaler" { # ... task "autoscaler" { # ... template { data = <<EOFscaling "batch" { enabled = true min = 0 max = 5 policy { cooldown = "1m" evaluation_interval = "10s" check "batch_jobs_in_progess" { source = "prometheus" query = "sum(nomad_nomad_job_summary_queued{exported_job=~\"batch/.*\"} + nomad_nomad_job_summary_running{exported_job=~\"batch/.*\"}) OR on() vector(0)" strategy "pass-through" {} } # ... }}EOF# ...This policy defines that, every 10 seconds, the Nomad Autoscaler will check how
many batch jobs are in progress. This is done by querying Prometheus for the sum
of the number of instances that are in the queued or running state.
Rearranging the query string makes it easier to understand it.
sum( nomad_nomad_job_summary_queued{exported_job=~"batch/.*"} + nomad_nomad_job_summary_running{exported_job=~"batch/.*"}) OR on() vector(0)The last part of the query (OR on() vector(0)) is used to return the value
0 instead of an empty result when there is no history of batch instances.
The result of this query is then sent to the strategy defined in the Nomad Autoscaler policy. In
this case, the pass-through strategy is used, so there is no
extra processing, and the number of batch_workers clients will equal the
number of batch job instances in progress.
The final component of the policy is the target, which will vary depending on cloud provider.
In AWS, the policy target is the Autoscaling Group where the nodes in the
batch_workers datacenter are running.
job "autoscaler" { # ... group "autoscaler" { # ... task "autoscaler" { # ... template { data = <<EOFscaling "batch" { # ... policy { # ... target "aws-asg" { aws_asg_name = "${aws_asg_name}" datacenter = "batch_workers" node_drain_deadline = "1h" node_selector_strategy = "empty_ignore_system" } }}EOF# ...Notice that the target defines a
node_selector_strategy. This value defines
how the Autoscaler will choose the nodes that will be removed when it's time to
scale in the cluster.
This policy uses the empty_ignore_system strategy, so
only clients that don't have any allocations running (not considering
allocations from system jobs) will be picked for removal. This is ideal for
batch jobs, since it avoids any disruption and allows them to run to completion.
To avoid overprovisioning, the max attribute defines that up to 5 clients will
be running at a given time. If there are more than 5 batch jobs in progress, the
number of clients is capped to max.
Open the scenario's Grafana dashboard
Retrieve the Grafana link from your Terraform output. Open it in a browser. It might take a minute to fully load if you didn't take some time earlier to explore the jobs.
Once loaded, you will receive a dashboard similar to this.
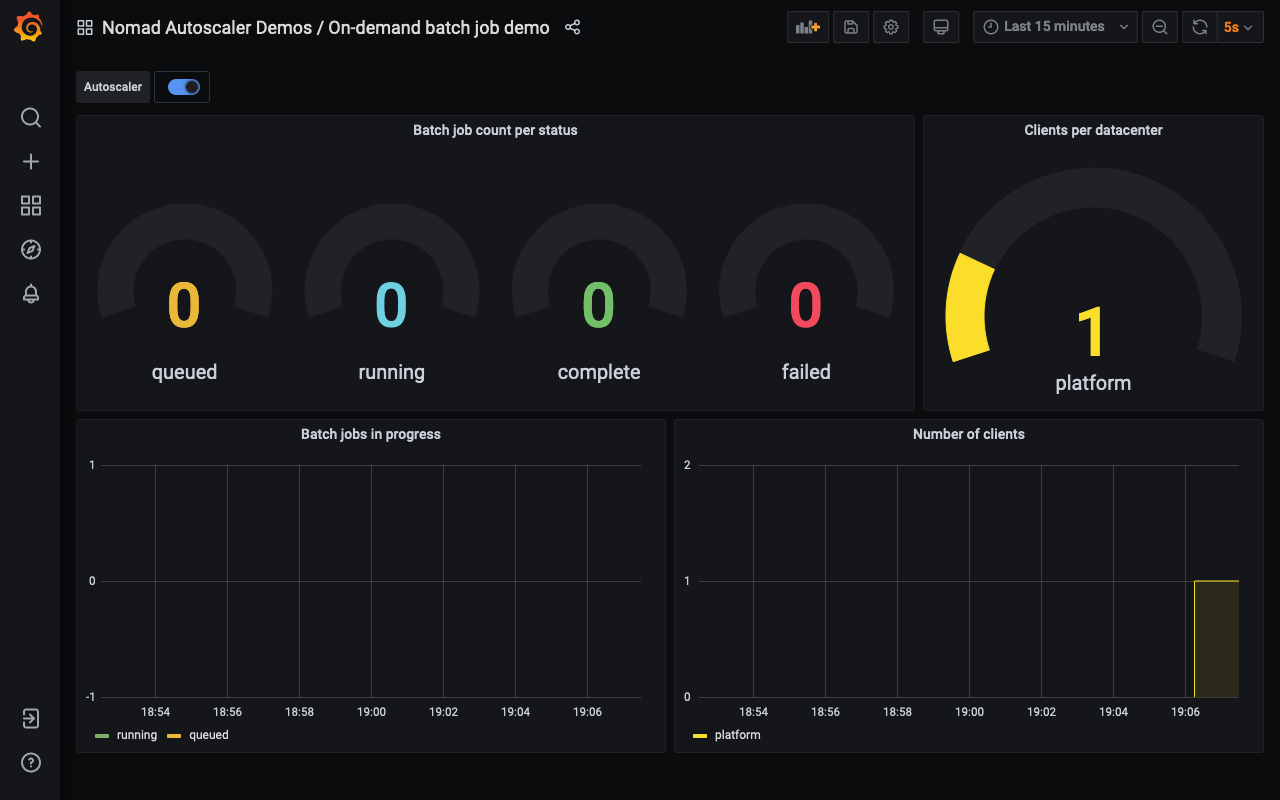
Notice that there are no clients from the batch_workers datacenter and also no
instances of the batch job recorded.
Dispatch batch job
Use the nomad job dispatch command to start an
instance of the batch job.
$ nomad job dispatch batchDispatched Job ID = batch/dispatch-1620256102-20467b5dEvaluation ID = fe77cd96==> Monitoring evaluation "fe77cd96" Evaluation triggered by job "batch/dispatch-1620256102-20467b5d" Evaluation status changed: "pending" -> "complete"==> Evaluation "fe77cd96" finished with status "complete" but failed to place all allocations: Task Group "batch" (failed to place 1 allocation): * No nodes were eligible for evaluation * No nodes are available in datacenter "batch_workers" Evaluation "207358f1" waiting for additional capacity to place remainderThe command output indicates that the job was not able to start, since there are
no clients in the batch_workers datacenter to satisfy its constraint.
The dashboard shows that a new instance is now enqueued.
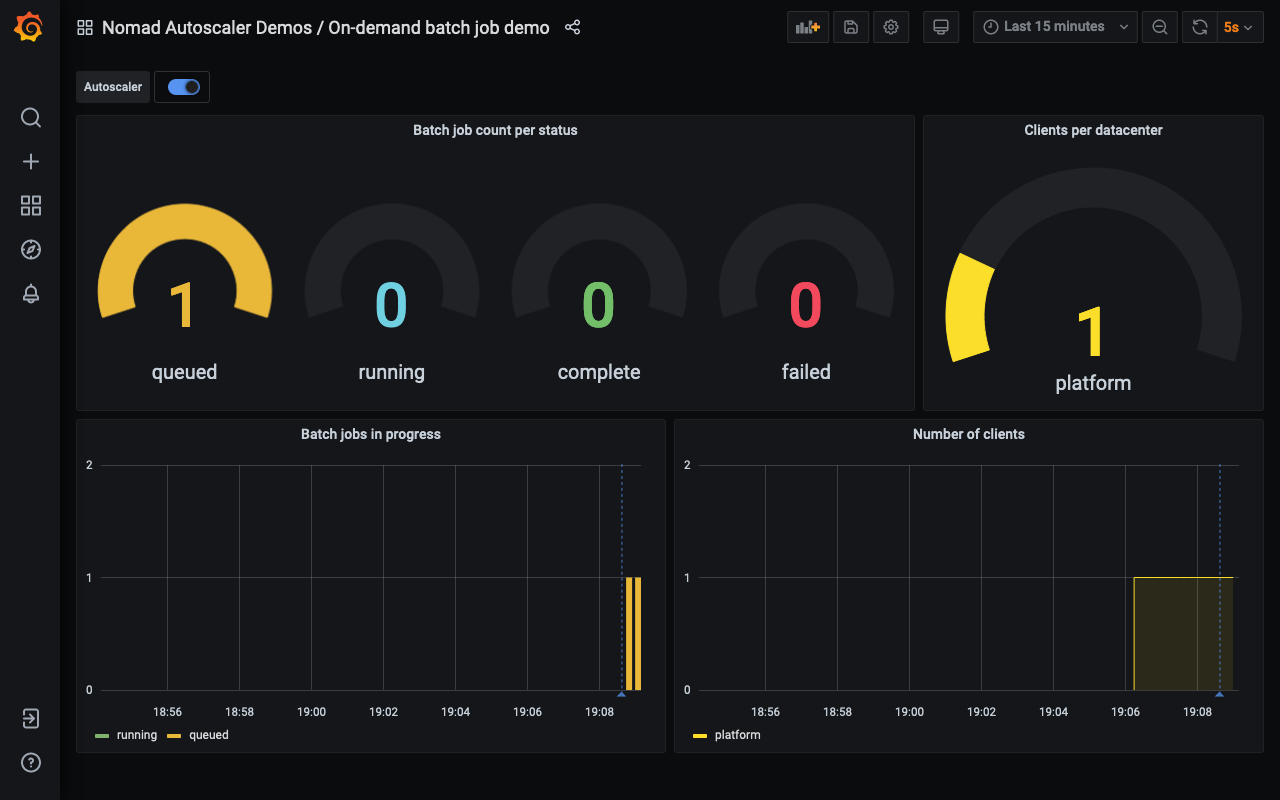
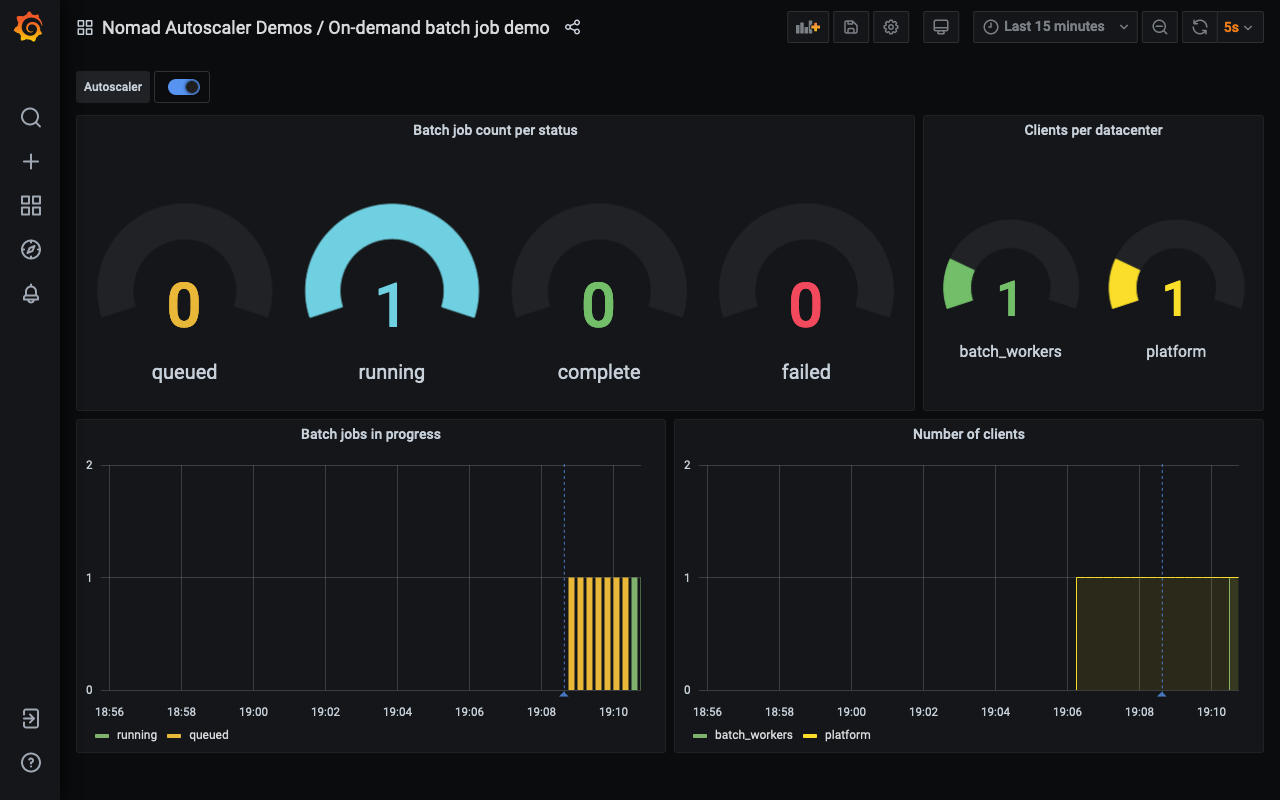
The dashed vertical blue line indicates that the Autoscaler detected that the
cluster needs to be scaled, and so, after a few minutes, a new client is added
to the batch_workers datacenter and the queued job starts running.
Dispatch two more instances of the batch job.
$ nomad job dispatch batch$ nomad job dispatch batchLike the previous time, the command output indicates that the job can not be
scheduled. However, this time the limitation is the amount of memory available
in the batch_workers datacenter.
Dispatched Job ID = batch/dispatch-1620256277-1240a1beEvaluation ID = 7b7f2a12==> Monitoring evaluation "7b7f2a12" Evaluation triggered by job "batch/dispatch-1620256277-1240a1be" Evaluation status changed: "pending" -> "complete"==> Evaluation "7b7f2a12" finished with status "complete" but failed to place all allocations: Task Group "batch" (failed to place 1 allocation): * Resources exhausted on 1 nodes * Class "hashistack" exhausted on 1 nodes * Dimension "memory" exhausted on 1 nodes Evaluation "78de4e93" waiting for additional capacity to place remainderThe dashboard now displays two instances in the queue and one running.
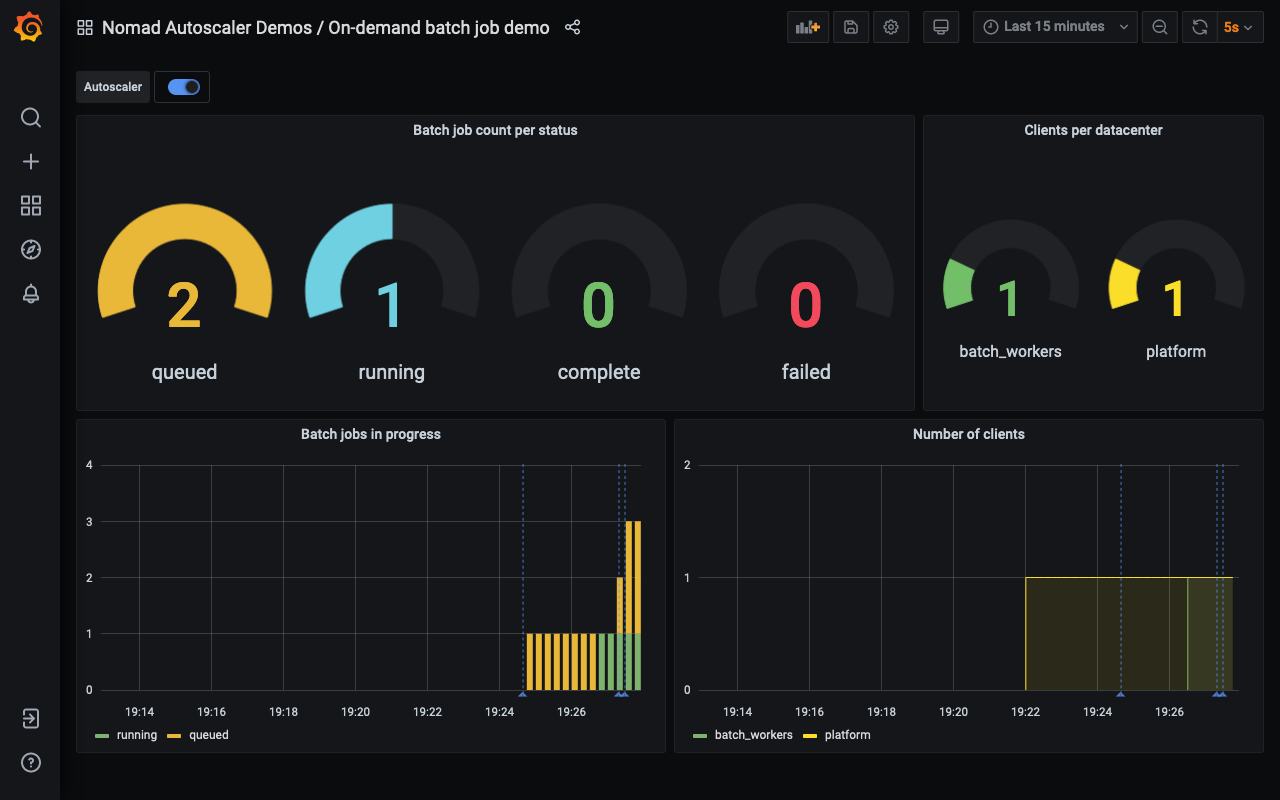
The total number of instances in progress is three, and so the Autoscaler scales out the cluster so that there are three clients running.
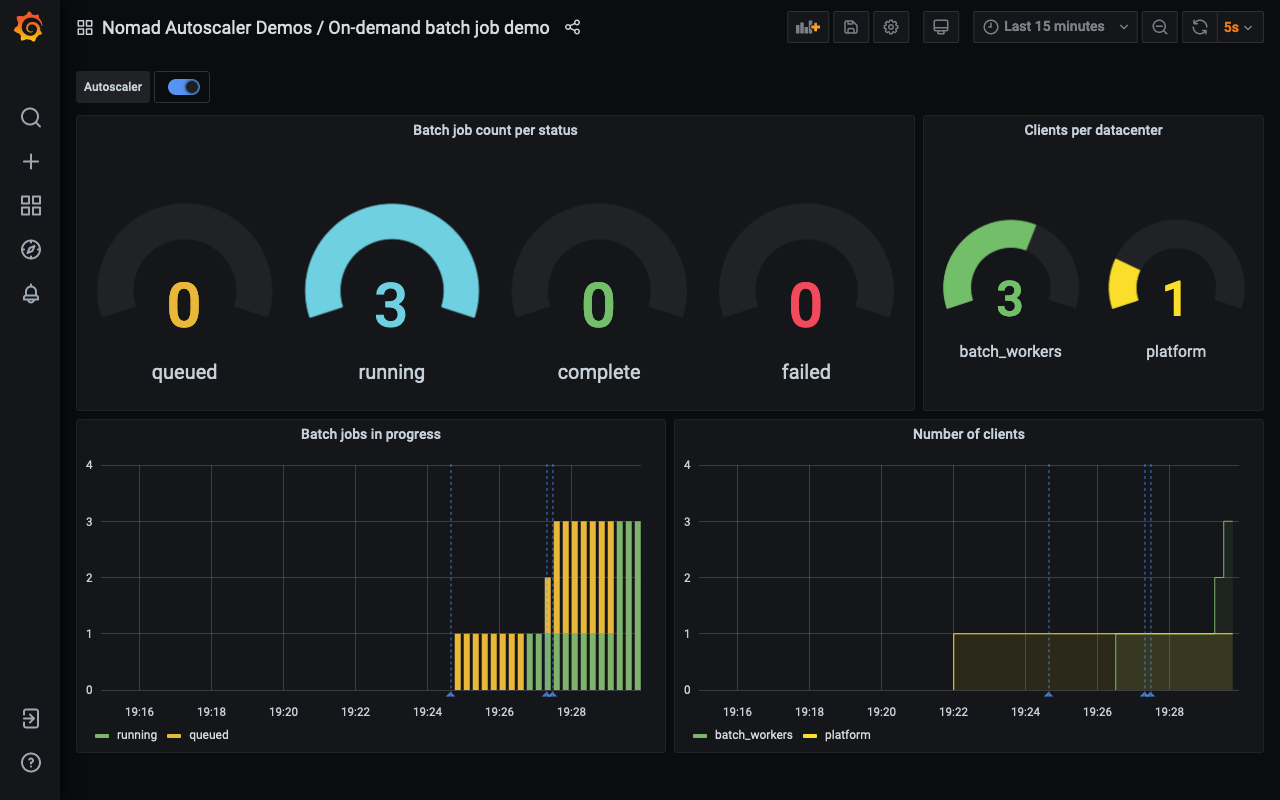
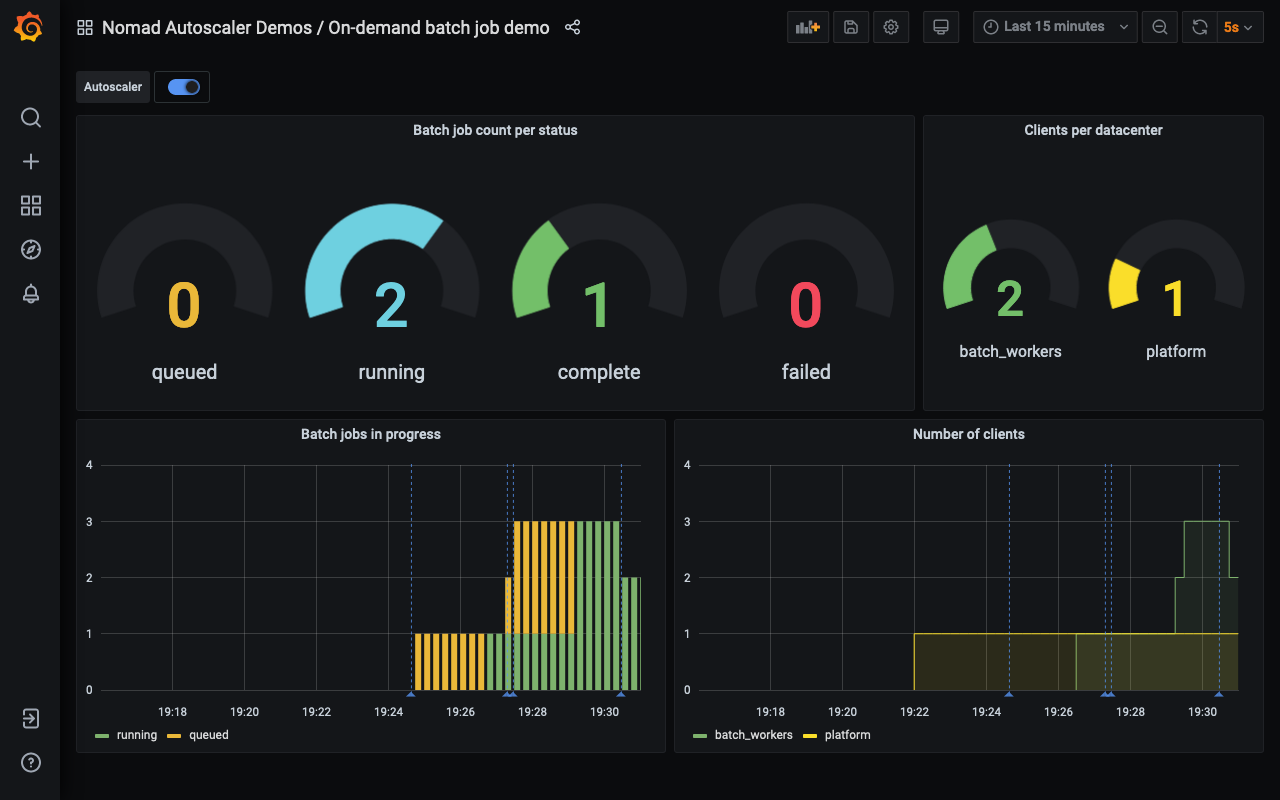
After a few more minutes, the first job completes, and the Autoscaler removes one client since it is not used anymore. The client removed is the one with no allocations running, so the other batch jobs continue running without disruption.
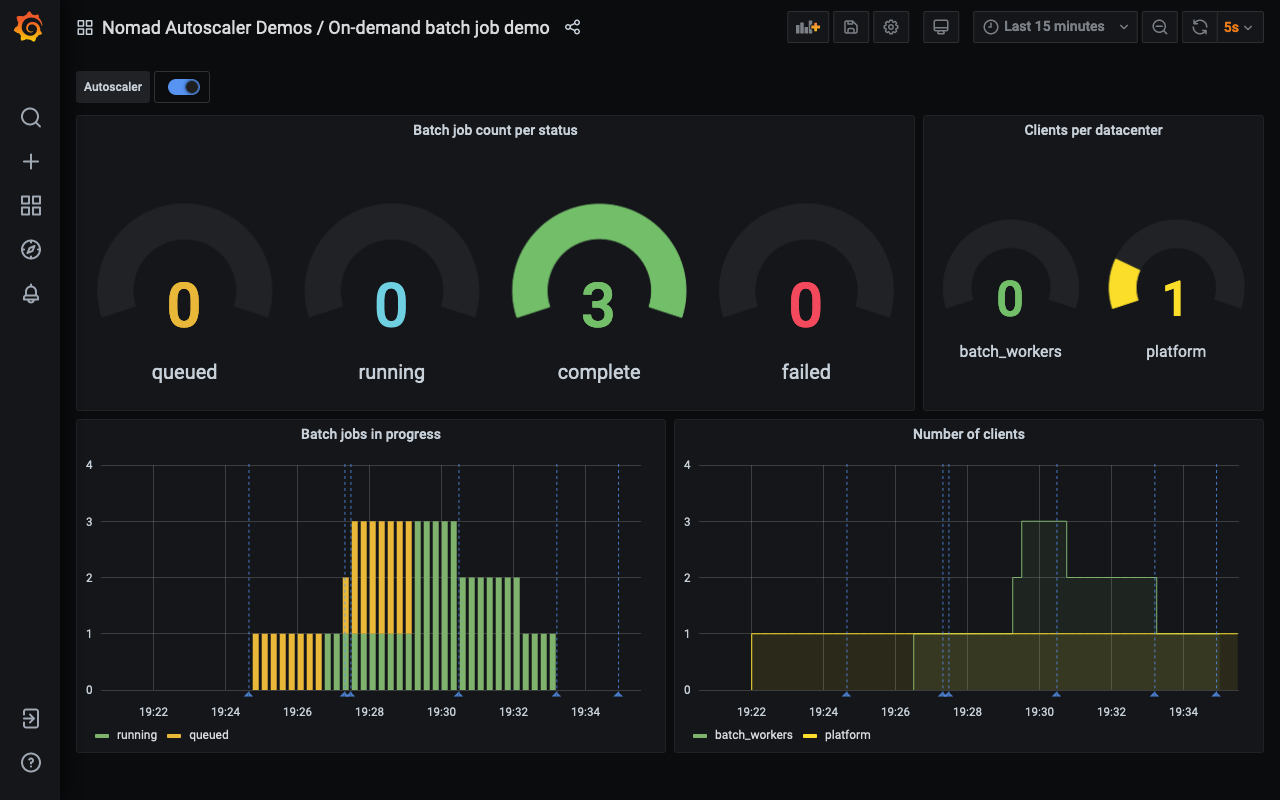
Finally, the last two jobs complete, and the Autoscaler brings the
batch_workers cluster back to zero, saving us the cost of having any clients
running without work.
Feel to dispatch more jobs and explore the scenario further.
Destroy the demo infrastructure
Once you are done experimenting with the autoscaler, use the terraform destroy
command to deprovision the demo infrastructure.
It is important to destroy the created infrastructure as soon as you are finished with the demo to avoid unnecessary charges in your cloud provider account.
$ terraform destroy --auto-approveNext steps
Now that you have explored horizontal cluster autoscaling for on-demand batch job with this demonstration, continue learning about the Nomad Autoscaler.